

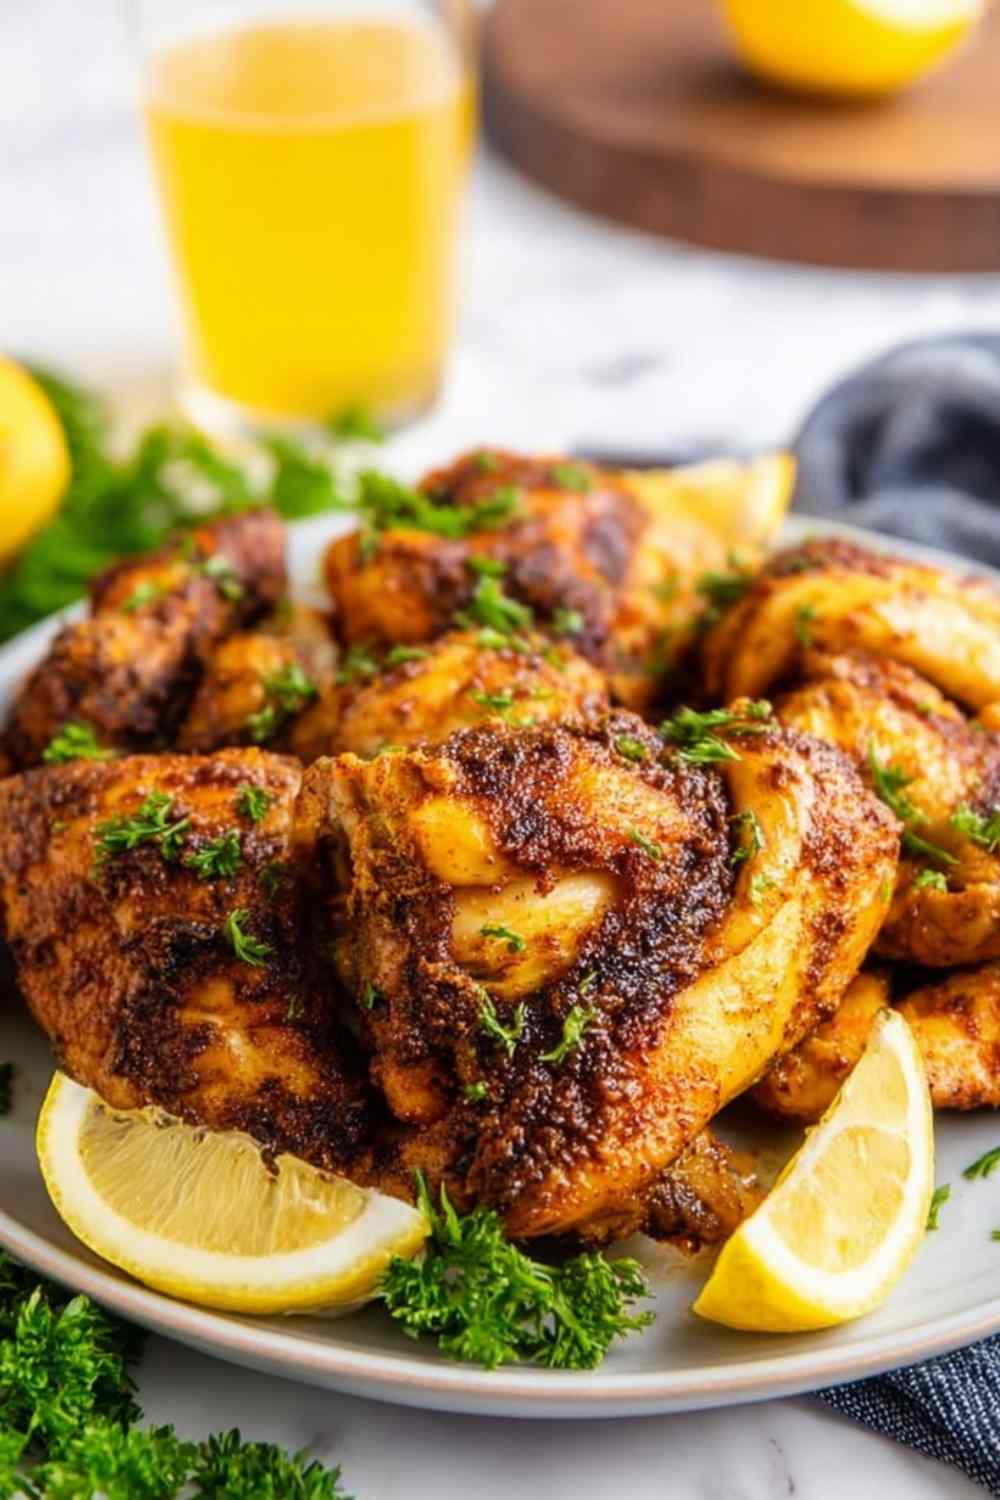
Beer can chicken is one of those grilling recipes that genuinely changed the way I cook whole chicken outdoors. A whole bird coated in a bold, smoky paprika rub, then grilled upright over a half-full beer can until fall-off-the-bone tender – this is summer grilling at its absolute best.
I still remember the first time I tried this at a backyard cookout years ago. The host pulled this golden, impossibly juicy bird off the grill and everyone stopped talking. The secret is simple: the beer steams inside the cavity the entire time, keeping the chicken moist from the inside out while the outside develops a deep, seasoned crust. This beer can chicken recipe has been my go-to ever since, and it works every single time.
Table of Contents
What You Need to Make This Showstopper Beer Can Chicken
I always keep this ingredient list as simple as possible because the seasoning rub does all the heavy lifting here. Pro tip – pull your beer can out of the fridge at least 30 minutes before you start so it reaches room temperature and begins steaming the moment it hits the hot grill.
For the Chicken:
- 1 (4-pound) whole chicken
- 2 tablespoons olive oil
- 12 oz beer (1 can, room temperature – I recommend an IPA for bold flavor, but any beer works great)
Seasoning Rub:
- 2 tablespoons ground paprika (smoked paprika adds an extra layer of depth if you have it)
- 1 tablespoon kosher salt
- 1 tablespoon ground black pepper
- 1 tablespoon onion powder
- 2 teaspoons dried thyme
- 2 teaspoons garlic powder
- 1/2 to 1 teaspoon cayenne pepper, to taste
Equipment:
- Outdoor grill
- Small mixing bowl
- Baking tray
- Aluminum foil
- Instant-read meat thermometer (non-negotiable for food safety)
- Paper towels

How to Grill Beer Can Chicken Step by Step
I recommend reading through all the steps before you fire up the grill. The process is very straightforward, but a couple of details make a real difference in the final result. Total active time is about 10 minutes – the grill handles the rest.
Step 1: Preheat your grill to medium-high heat, aiming for 375 to 450 degrees F. Give it 10 to 15 minutes to fully preheat before the chicken goes on.
Step 2: In a small bowl, combine the paprika, kosher salt, black pepper, onion powder, dried thyme, garlic powder, and cayenne. Mix well until fully blended into a uniform rub.
Step 3: Pat the entire chicken completely dry with paper towels on all surfaces, including the cavity. Do not skip this step. Moisture on the skin prevents the rub from adhering properly and prevents the skin from crisping.
Step 4: Rub olive oil all over the outside of the chicken and work it under the skin wherever you can reach. Apply the seasoning rub generously over every surface, including under the skin. Flip the bird and make sure the back is fully coated. Getting the rub under the skin is what delivers maximum flavor directly into the meat.
Step 5: Open the beer can and pour out roughly half of it. The can must be only half full when the chicken sits on top. Never cook with a full can – the liquid needs room to produce steam. Room temperature beer begins steaming immediately when it hits the hot grill, which is exactly what drives this recipe.
Step 6: Hold the chicken upright with the legs pointing down and carefully lower it onto the open beer can, inserting the can deep into the cavity. The two legs and the beer can form a three-point tripod. Adjust the legs until the chicken stands fully stable on its own before moving it to the grill. Do not rush this step – a wobbly setup means a tipped chicken mid-cook.
Step 7: Place the upright chicken and can in the center of the preheated grill. Close the lid and cook completely undisturbed for 1 hour. Opening the lid releases the enclosed heat and steam that keep this chicken moist and cooking evenly.
Step 8: At the one-hour mark, begin checking the internal temperature of the thickest part of the thigh, keeping the thermometer away from any bone. Check every 15 minutes until it reads 165 degrees F. Total cook time is typically 75 minutes for a 4-pound bird, though this varies slightly based on exact bird size and grill temperature.
Step 9: Very carefully transfer the chicken and can together onto a baking tray – both will be extremely hot. Cover loosely with aluminum foil and rest for a full 10 minutes before carving. This rest is not optional. It lets the juices redistribute through the entire bird so every piece stays moist on the plate.
Step 10: Carve and serve immediately. Enjoy every bite.
Best Sides to Serve with Beer Can Chicken at Your Next Cookout
This smoky, juicy chicken pairs beautifully with classic summer sides that hold their own against bold BBQ flavor. Here are the best sides for beer can chicken to round out the meal:
Classic Coleslaw: The cool, creamy crunch cuts right through the rich, smoky chicken and beautifully balances the heat from the cayenne.
Potato Salad: Hearty and satisfying, potato salad soaks up any extra chicken juices on the plate and makes the meal feel truly complete.
Corn on the Cob: Sweet grilled corn is the ultimate seasonal pairing with smoky paprika chicken – both come off the grill at the same time for easy timing.
Baked Beans: The sweet, savory depth of baked beans is a natural match for the bold spice rub on this chicken.
Warm Rolls or Cornbread: Perfect for soaking up every last drop of flavor and rounding out a full BBQ spread.
Roasted or Grilled Vegetables: A lighter option that lets the chicken stay the star while adding color and nutrition to the plate.
More Chicken Recipes Worth Firing Up the Grill For
If this beer can chicken recipe has you craving more bold, flavorful chicken dinners, there are plenty more to explore. The Grilled Huli Huli Chicken brings sweet and smoky Hawaiian flavors that work beautifully on the same grill, while the Grilled California Avocado Chicken is a fresh, crowd-pleasing option perfect for summer cookouts.
Looking for ways to use leftover grilled chicken the next day? The Chicken Caesar Pasta Salad and the BBQ Chicken Pasta Salad both make excellent use of pulled chicken, turning one bird into a completely different and satisfying meal with minimal effort.

Storing and Reheating Your Beer Can Chicken the Right Way
Leftover beer can chicken stores beautifully and is honestly just as good the next day. Store carved chicken in an airtight container in the refrigerator for up to 3 days. For longer storage, place in a freezer-safe bag or container and freeze for up to 3 months. Thaw overnight in the refrigerator before reheating.
To reheat, warm the chicken in the oven at 350 degrees F covered loosely with foil until heated through. You can also microwave in 30-second intervals if you are short on time. The foil cover during oven reheating helps retain moisture so the chicken stays juicy rather than drying out.
Pro tip – leftover chicken pulled off the bone is incredible in tacos, sandwiches, pasta, or green salads the next day. One grilled bird turns into multiple easy meals throughout the week.
Beer Can Chicken Recipe FAQs
Can I use something other than beer in the can?
Absolutely. Any liquid in a similarly sized can works well – soda, apple juice, canned vegetables, or canned beans all produce steam the same way. Remove labels from any can before placing it on the grill. If you use canned vegetables or beans, the seasoned liquid that remains after cooking makes a flavorful side dish when brought to a boil on the stovetop.
My chicken skin is not getting crispy – what went wrong?
The most common cause is skipping the paper towel drying step. Moisture on the skin traps steam against it and prevents crisping. Make sure the chicken is fully dry before applying oil and the seasoning rub. Also confirm your grill reached full temperature before the chicken went on.
What size chicken works best for this recipe?
This rub and method are sized for a 3.5 to 5 pound bird. Do not go larger than 5 pounds – a bigger chicken may not balance properly on the beer can tripod, and the weight becomes unstable on the grill. A 4-pound bird is the sweet spot for this beer can chicken recipe.
Can I make this in the oven instead of on the grill?
Yes. Set your oven to 400 degrees F and place the chicken-on-can setup in a roasting pan. Cook using the same temperature guidelines and begin checking at the one-hour mark. You will not get the same smoky char as the grill, but the method still produces a wonderfully moist bird.
Go Fire Up the Grill – This Beer Can Chicken Recipe Is Worth Every Minute
This is one of those recipes that looks impressive and tastes incredible but is genuinely simple to pull off. Ten minutes of prep, a bold smoky rub, and the grill does everything else over the next 75 minutes. The result is the most moist, flavorful whole grilled chicken you will ever put on the table. Try this beer can chicken recipe this weekend and watch it become your most requested summer grilling dish. Your backyard cookout just got a whole lot better.
Beer Can Chicken Recipe

A whole chicken coated in a bold smoky paprika and herb seasoning rub, grilled upright over a half-full beer can until wonderfully moist, deeply flavorful, and fall-off-the-bone tender. Only 10 minutes of prep – the ultimate summer grilling showstopper that feeds 6 from a single 4-pound bird.
- Prep Time: 10 minutes
- Cook Time: 75 minutes
- Total Time: 85 minutes
- Yield: 6 servings 1x
- Category: Main Course
- Method: Grill
- Cuisine: American
- Diet: Gluten Free
Ingredients
- 1 (4-pound) whole chicken
- 2 tablespoons olive oil
- 12 oz beer (1 can, room temperature – IPA recommended)
- 2 tablespoons ground paprika
- 1 tablespoon kosher salt
- 1 tablespoon ground black pepper
- 1 tablespoon onion powder
- 2 teaspoons dried thyme
- 2 teaspoons garlic powder
- 1/2 to 1 teaspoon cayenne pepper, to taste
Instructions
- Preheat your outdoor grill to medium-high heat between 375 and 450 degrees F. Allow 10 to 15 minutes for the grill to fully preheat.
- In a small bowl, combine paprika, kosher salt, black pepper, onion powder, dried thyme, garlic powder, and cayenne pepper. Mix well to form the seasoning rub.
- Pat the whole chicken completely dry with paper towels on all surfaces including the cavity. This step is essential for the rub to adhere and the skin to crisp properly.
- Rub olive oil generously over the entire outside of the chicken and under the skin wherever possible. Apply the seasoning rub generously all over the outside, under the skin, and on the back of the bird until fully coated.
- Open the beer can and pour out approximately half of the beer so the can is only half full. Room temperature beer is important – it begins steaming immediately when placed on the hot grill.
- Hold the chicken upright with legs pointing down and carefully lower it onto the open beer can, inserting the can deep into the cavity. Use the two legs and the beer can as a three-point tripod to balance the chicken upright. Adjust as needed until fully stable before moving to the grill.
- Place the upright chicken with the can in the center of the preheated grill. Close the lid and cook completely undisturbed for 1 hour.
- At the one-hour mark, begin checking the internal temperature of the thickest part of the thigh, away from the bone, every 15 minutes until it reads 165 degrees F. Total cook time is typically 75 minutes for a 4-pound bird.
- Very carefully transfer the chicken and can together to a baking tray. Both will be extremely hot. Cover loosely with foil and rest for 10 minutes before carving.
- Carve the chicken and serve immediately with your favorite summer sides.
Notes
- Use a chicken between 3.5 and 5 pounds. Do not exceed 5 pounds – larger birds may not balance safely on the beer can tripod.
- Room temperature beer is essential. Cold beer delays steaming inside the cavity. Never use a full can – half full is correct so there is room for steam to build.
- Any liquid in a similar sized can works as a substitute including soda, juice, canned vegetables, or canned beans. Remove labels from any can before grilling.
- Do not open the grill lid during the first hour of cooking. Consistent enclosed heat produces the steam that keeps the chicken moist throughout.
- The seasoning rub works as an all-purpose dry rub on any cut of chicken with any cooking method including baking, air frying, or pan searing.
Nutrition
- Serving Size: 1 serving (1/6 of chicken)
- Calories: 356 kcal
- Sugar: 1 g
- Sodium: 1257 mg
- Fat: 24 g
- Saturated Fat: 6 g
- Unsaturated Fat: 16 g
- Trans Fat: 1 g
- Carbohydrates: 6 g
- Fiber: 2 g
- Protein: 25 g
- Cholesterol: 95 mg


