

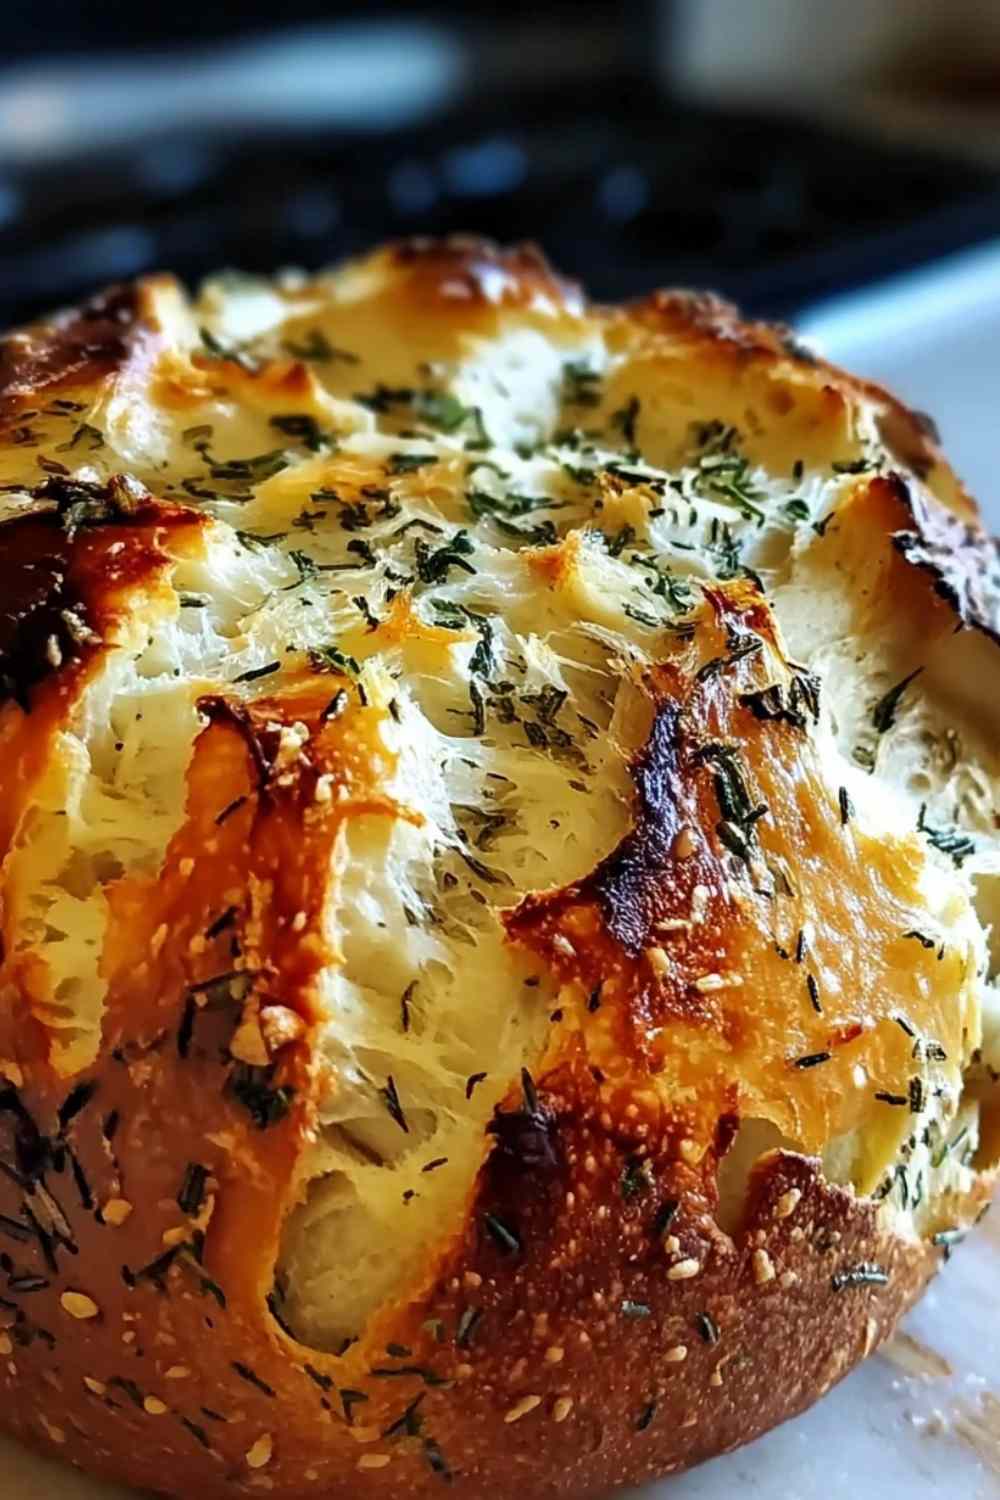
Garlic herb Dutch oven bread is one of those recipes that makes you feel like a professional baker, even if you’ve never baked bread before. The crispy golden crust crackles when you slice into it, revealing soft, fluffy bread infused with aromatic garlic and fresh herbs. This no-knead method changed my approach to bread baking completely because it proves that time does the heavy lifting, not your hands.
I still remember pulling my first loaf from the Dutch oven on a chilly Sunday morning. The entire house smelled like a French bakery, with roasted garlic and rosemary filling every corner. My husband walked into the kitchen and asked if I’d ordered from the bakery downtown. This recipe relies on a long, slow rise that develops incredible flavor and structure while you sleep. The combination of fragrant herbs, savory garlic, and olive oil creates bakery-quality artisan bread that pairs perfectly with soups, stews, or simply good butter. Whether you’re new to bread baking or looking for an easy Dutch oven bread recipe, this foolproof method delivers crusty, flavorful results every single time.
Table of Contents
What You’ll Need for This Dutch Oven Garlic Bread
Before you start mixing your dough, gather these simple ingredients for the best garlic herb Dutch oven bread. I always use fresh herbs when possible because they add so much more flavor than dried, and good quality olive oil makes a noticeable difference in the final taste.
- 3 ½ cups all-purpose flour
- 1 ½ teaspoons active dry yeast
- 1 teaspoon salt
- 1 tablespoon sugar
- 1 ½ cups warm water (about 110°F)
- 3 cloves garlic, minced
- 2 tablespoons fresh herbs (like rosemary, thyme, parsley), chopped
- 2 tablespoons olive oil
- Flaky sea salt for topping (optional)
Pro tip: I prefer using a combination of rosemary and thyme, but you can customize the herb blend to your taste. Fresh parsley adds a bright, clean flavor that complements the garlic beautifully. If your yeast is older than 6 months, test it first by mixing with warm water and a pinch of sugar. It should bubble within 10 minutes.

How to Make Perfect No-Knead Garlic Herb Bread
I recommend starting this bread the night before you want to serve it, as the long rise time is what creates that amazing flavor and texture. Don’t let the overnight timeline intimidate you because the actual hands-on work takes less than 10 minutes.
Step 1: In a large bowl, whisk together the flour, yeast, salt, and sugar until everything is evenly distributed. This ensures your yeast activates properly throughout the dough.
Step 2: In a separate small bowl, combine the warm water (make sure it’s about 110°F, not too hot or it will kill the yeast), minced garlic, chopped fresh herbs, and olive oil. Stir to combine.
Step 3: Pour the wet mixture into the dry ingredients. Mix with a wooden spoon or spatula until a shaggy, sticky dough forms. The dough will look rough and messy, and that’s exactly what you want. There’s no need to knead at all.
Step 4: Cover the bowl with plastic wrap or a clean kitchen towel. Let it rise at room temperature (68-75°F is ideal) for 8-12 hours, or until the surface is dotted with bubbles and the dough has more than doubled in size. I usually mix mine around 8 PM and bake it between 8 AM and noon the next day.
Step 5: When the dough is ready, place a 5-quart or larger Dutch oven with its lid on inside your oven. Preheat the oven to 450°F (230°C) for at least 30 minutes. This preheating step is crucial for getting that crispy crust on your garlic herb Dutch oven bread.
Step 6: Carefully remove the hot Dutch oven from the oven using heavy-duty oven mitts. Place a piece of parchment paper inside the pot to prevent sticking and make removal easier.
Step 7: Scrape the dough onto a lightly floured surface and shape it into a rough ball. Don’t worry about making it perfect. The dough will be very sticky, so wet your hands slightly if needed. Place the dough ball into the hot Dutch oven on top of the parchment paper.
Step 8: If desired, sprinkle the top with a little flaky sea salt for extra flavor and a professional touch.
Step 9: Put the lid back on the Dutch oven and return it to the oven. Bake for 30 minutes with the lid on. The covered baking creates steam, which helps develop that crispy crust.
Step 10: After 30 minutes, carefully remove the lid from the Dutch oven. The bread should be puffy and starting to color. Bake for another 10-15 minutes, uncovered, until the crust is a deep golden brown.
Step 11: Carefully lift the bread out of the Dutch oven using the parchment paper and place it on a wire rack. Let it cool completely before slicing, at least 1 hour. Cutting too early releases steam and can make the interior gummy.
Pro tip: The bread should sound hollow when you tap the bottom. That’s how you know it’s fully baked through.
Best Ways to Serve Your Homemade Garlic Bread
This crusty garlic herb Dutch oven bread pairs beautifully with so many dishes, making it incredibly versatile for any meal.
Creamy Tomato Soup: The herbs and garlic in the bread complement rich, tangy tomato soup perfectly. Use it for dipping or make grilled cheese sandwiches.
Hearty Beef Stew: The sturdy crust holds up well for soaking up flavorful gravy, while the soft interior provides the perfect textural contrast.
Italian Pasta Dishes: Serve alongside spaghetti marinara or fettuccine alfredo to mop up every bit of sauce.
Olive Oil and Balsamic Vinegar: Simply tear off chunks and dip into good quality olive oil mixed with balsamic vinegar for an easy appetizer.
Breakfast Sandwiches: Slice thick pieces and use them for egg sandwiches or avocado toast for a gourmet breakfast.
This is definitely one of the best breads for soup season, but it works year-round for any occasion.
Time to Bake Your Best Bread Yet
Making homemade garlic herb Dutch oven bread is easier than you ever imagined, and the results are absolutely worth the minimal effort. The overnight rise does all the hard work for you, creating complex flavors and a perfect texture that rivals any bakery loaf. With just a few simple ingredients and a Dutch oven, you can enjoy crusty, aromatic bread that will impress everyone at your table. Try this recipe and discover how satisfying bread baking can be!
More Comforting Recipes to Pair with Homemade Bread
Fresh baked garlic herb Dutch oven bread deserves equally delicious recipes to accompany it. Serve warm slices alongside our hearty Crockpot Cowboy Soup for a satisfying meal that combines crusty bread with rich, smoky flavors. The bread is also perfect for dipping into our creamy Creamy Tuscan Garlic Tortellini Soup, where the garlic flavors beautifully complement each other.
For lighter fare, pair this artisan bread with our Club Sandwich Pasta Salad or use thick slices to create gourmet sandwiches with Crispy Parmesan Chicken with Rich Garlic Sauce. The bread also makes an excellent base for breakfast, especially when topped with spreads or served alongside Sweet Potato Honey Cornbread for a complete brunch spread.

Storing Your Dutch Oven Bread for Maximum Freshness
Store the garlic herb Dutch oven bread in an airtight container or a bread bag at room temperature for up to 2 days. I recommend keeping it cut-side down on a cutting board covered with a clean kitchen towel if you don’t have a bread bag. This helps maintain the crispy crust while keeping the interior soft.
For reheating, wrap the bread in foil and warm it in a 350°F oven for about 10 minutes. This refreshes the crust and brings back that just-baked texture. You can also toast individual slices for sandwiches or breakfast.
Pro tip: For longer storage, slice the bread completely and freeze it in a freezer bag for up to 3 months. Toast slices directly from frozen for quick garlic bread whenever you need it. I love having homemade bread ready to go in the freezer.
Common Questions About Making Garlic Herb Bread
Can I use instant yeast instead of active dry yeast?
Yes, you can substitute instant yeast in the same amount. The rising time may be slightly shorter, so watch for the dough to double in size rather than going strictly by the clock.
Why is my Dutch oven bread dense instead of fluffy?
This usually happens if the dough didn’t rise long enough or if the yeast was expired. Make sure your yeast is fresh and give the dough the full 8-12 hours to develop properly at room temperature (68-75°F). If your kitchen is very cold, the rise may take longer.
Can I make this garlic herb Dutch oven bread without fresh herbs?
You can use 2 teaspoons of dried herbs instead of fresh, but reduce the amount since dried herbs are more concentrated. The flavor won’t be quite as bright, but it will still be delicious.
Garlic Herb Dutch Oven Bread

Easy no-knead garlic herb Dutch oven bread with crispy crust and soft, fluffy interior. Beginner-friendly recipe ready in 12 hours.
- Prep Time: 15 minutes
- Cook Time: 45 minutes
- Total Time: 12 hours
- Yield: 1 loaf (8-10 servings) 1x
- Category: Bread
- Method: No-Knead, Bake
- Cuisine: American
- Diet: Vegetarian
Ingredients
- 3 ½ cups all-purpose flour
- 1 ½ teaspoons active dry yeast
- 1 teaspoon salt
- 1 tablespoon sugar
- 1 ½ cups warm water (about 110°F)
- 3 cloves garlic, minced
- 2 tablespoons fresh herbs (like rosemary, thyme, parsley), chopped
- 2 tablespoons olive oil
- Flaky sea salt for topping (optional)
Instructions
- In a large bowl, whisk together the flour, yeast, salt, and sugar until evenly distributed.
- In a separate small bowl, combine the warm water (about 110°F), minced garlic, chopped fresh herbs, and olive oil.
- Pour the wet mixture into the dry ingredients. Mix with a wooden spoon or spatula until a shaggy, sticky dough forms. No kneading required.
- Cover the bowl with plastic wrap or a clean kitchen towel. Let it rise at room temperature for 8-12 hours, until the surface is dotted with bubbles and the dough has more than doubled in size.
- Place a 5-quart or larger Dutch oven with its lid on inside your oven. Preheat the oven to 450°F (230°C) for at least 30 minutes.
- Carefully remove the hot Dutch oven from the oven. Place a piece of parchment paper inside the pot.
- Scrape the dough onto a lightly floured surface and shape it into a rough ball. Place the dough ball into the hot Dutch oven on top of the parchment paper.
- If desired, sprinkle the top with flaky sea salt.
- Put the lid back on the Dutch oven and return it to the oven. Bake for 30 minutes with the lid on.
- Carefully remove the lid from the Dutch oven. Bake for another 10-15 minutes, uncovered, until the crust is a deep golden brown.
- Carefully lift the bread out using the parchment paper and place it on a wire rack to cool completely before slicing, at least 1 hour.
Notes
- The long rise time (8-12 hours) is crucial for developing flavor and structure. Plan to start the night before.
- Be very careful when handling the preheated Dutch oven. Use high-quality oven mitts to prevent burns.
- The dough will be very sticky. Wet your hands slightly to make shaping easier without adding too much extra flour.
- For best flavor, let the dough rise for the full 12 hours. Use a kitchen scale to measure flour for consistent results.
- Experiment with different herb combinations like rosemary and thyme, or parsley and chives.
Nutrition
- Serving Size: 1 slice (1/10 of loaf)
- Calories: 185 kcal
- Sugar: 1 g
- Sodium: 240 mg
- Fat: 3 g
- Saturated Fat: 0.5 g
- Unsaturated Fat: 2.5 g
- Trans Fat: 0 g
- Carbohydrates: 34 g
- Fiber: 1 g
- Protein: 5 g
- Cholesterol: 0 mg


