

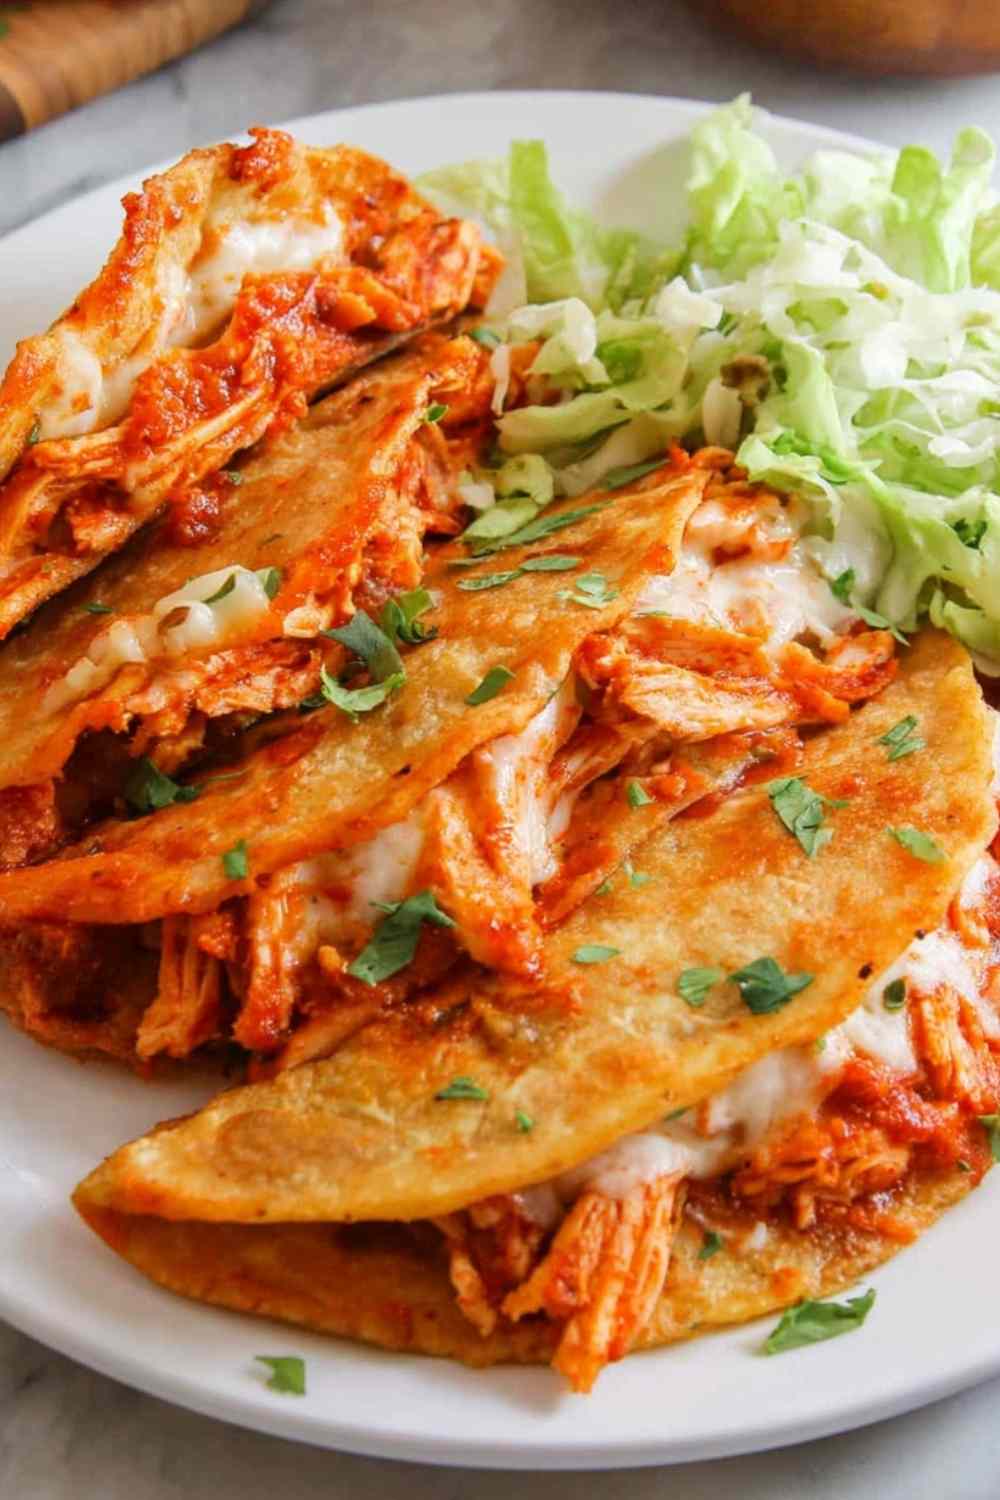
Crispy baked chicken tacos are my go-to when I need a dinner that feels exciting but comes together without a lot of fuss. These golden, crunchy tacos skip the frying completely, and honestly, you would never know the difference once they come out of the oven. If taco night has been feeling a little stale lately, this recipe will fix that fast.
I started making these on busy weeknights when I had leftover rotisserie chicken and not much else in the fridge. One jar of salsa, a pack of taco seasoning, and some corn tortillas later, something wonderful happened. The kitchen smelled amazing, the cheese was bubbling, and the shells were perfectly golden and crunchy. These crispy baked chicken tacos have been in our regular dinner rotation ever since. They are easy enough for a Tuesday and fun enough for a taco night with friends. Whether you are feeding picky kids or a hungry crowd, this baked taco recipe gets it done.
Table of Contents
What You Will Need to Make These Tacos
I always keep these ingredients on hand because they are pantry staples that pull together a real dinner without a last-minute grocery run. Pro tip: a store-bought rotisserie chicken cuts your prep time significantly and adds great flavor to the filling.
- 2 cups cooked and shredded chicken (rotisserie works great)
- 3 tablespoons olive oil, divided
- 1/4 teaspoon salt
- 1/4 teaspoon black pepper
- 1 medium white onion, chopped
- 1 jar (16 oz) salsa (I prefer medium heat for a balanced kick)
- 1 packet (1 oz) taco seasoning
- 10 to 12 corn tortillas
- 1 1/2 cups shredded Colby Jack cheese (freshly shredded melts better than the pre-shredded bags)
- Juice of 1 lime
Pro tip: If Colby Jack is not available, a Mexican blend or Monterey Jack works just as well. Both melt beautifully and give you that golden, stretchy cheese pull in your crispy baked chicken tacos.

How to Make Crispy Baked Chicken Tacos at Home
I recommend reading through all the steps before you start. The process moves quickly once the filling is ready, so it helps to have everything prepped and within reach.
Step 1: Preheat your oven to 425 degrees F. Line a 9×13-inch baking sheet with parchment paper. If you have a larger sheet pan, use it to fit all the tacos in a single layer without crowding.
Step 2: Heat 2 tablespoons of olive oil in a large skillet over medium-high heat. Add the chopped onion and cook until softened and translucent, about 3 minutes. You should start to smell the onion sweetening up as it cooks.
Step 3: Stir in the shredded chicken, salsa, taco seasoning, salt, and pepper. Cook everything together for 2 to 3 minutes so the flavors come together. Remove the skillet from heat and stir in the fresh lime juice. Before you start filling tacos, tilt the pan slightly and use a spoon to drain any extra liquid from the mixture. Too much liquid in the filling is the number one reason tacos turn out soggy.
Step 4: Wrap all your corn tortillas in a damp paper towel and microwave them for 30 seconds. This step is not optional. Cold tortillas crack straight down the middle when you try to fold them, and you lose your filling onto the baking sheet. Warm tortillas fold cleanly and hold their shape through baking.
Step 5: Spoon the chicken mixture onto one half of each tortilla. Keep the filling to a moderate amount so the tortilla folds without splitting. Sprinkle cheese over the filling, fold the tortilla over, and press it down gently onto the parchment-lined baking sheet so it stays closed during baking.
Step 6: Lightly brush the tops of each taco with the remaining 1 tablespoon of olive oil. This is what creates the golden, crunchy exterior that makes crispy baked chicken tacos worth making. Do not skip it.
Step 7: Bake for 12 to 15 minutes until the shells are golden brown and crispy. If you want extra crunch, flip the tacos carefully at the halfway point using a spatula. Look for deep golden color along the edges and a firm shell as your signal that they are done.
Step 8: Pull them from the oven and serve immediately while warm. The crunchy shell softens quickly as it sits, so get toppings ready before the tacos come out.
Common mistake: Overfilling the tortillas. Too much filling makes them hard to fold and causes them to pop open in the oven.
The Best Toppings and Sides for Crispy Baked Chicken Tacos
These tacos are bold and flavorful on their own, but the right toppings take them from weeknight dinner to something special. Here are the best sides and toppings to serve alongside crispy baked chicken tacos:
Sour cream: The cool, creamy tang cuts right through the warm spice of the taco seasoning and balances the richness of the melted cheese.
Shredded lettuce: Adds a refreshing crunch that contrasts nicely with the crispy baked shell.
Fresh cilantro: A handful of chopped cilantro brightens the whole plate with a clean herby finish that pairs well with the lime in the filling.
Guacamole or sliced avocado: Rich and creamy, avocado softens the bold salsa flavor and adds a satisfying element to each bite.
Extra salsa: A fresh spoonful on top adds more smoky, tangy flavor if you like a saucier taco.
Pickled jalapenos: If heat is your thing, these add a vinegary punch that works really well with the melted cheese.
More Easy Dinners Worth Trying
If these crispy baked chicken tacos hit the spot, there are plenty more quick and satisfying chicken dinners to explore. The Dill Pickle Ranch Smash Chicken Tacos and Crispy Chicken Wonton Tacos are two reader favorites that bring a totally different flavor punch to taco night. For something equally easy but a little different, the Grilled Mediterranean Chicken Tacos are fresh and packed with flavor.
Looking for something to round out the meal? The Easy Taco Rice Bowl pairs perfectly with the same seasoned chicken filling and makes a great next-day leftover option. For a heartier spread, the High Protein Chicken Cottage Cheese Enchilada Bowls and Slow Cooker Queso Chicken Tacos are both crowd-pleasers that belong on any taco night menu.

How to Store and Reheat Leftover Tacos
Leftover crispy baked chicken tacos store well in an airtight container in the refrigerator for up to 3 days. Stack them carefully to avoid crushing the shells.
When it is time to reheat, skip the microwave. Place the tacos on a baking sheet in a 375 degree F oven for 5 to 7 minutes. This brings the crunch back and heats the filling through without making the shell rubbery. I recommend checking them at the 5 minute mark since oven temperatures vary.
Pro tip: You can assemble the tacos completely and freeze them unbaked for up to 2 months. Lay them flat on a parchment-lined sheet to freeze first, then transfer to a zip-lock bag. Bake straight from frozen at 425 degrees F and add 5 to 8 extra minutes to the baking time.
Common Questions About This Recipe
Can I use flour tortillas instead of corn?
Yes, flour tortillas will work, but they produce a softer, chewier shell rather than the crispy crunch that defines this recipe. Corn tortillas are strongly recommended for the best texture in crispy baked chicken tacos.
My tacos came out soggy. What went wrong?
The most likely cause is too much liquid in the chicken filling. Make sure to drain excess moisture from the mixture before spooning it into your tortillas. Also check that you brushed the tops with olive oil before baking, since that is essential for crisping the shell.
Can I prepare the filling in advance?
Yes. The chicken filling can be made up to 2 days ahead and stored in a covered container in the refrigerator. Assemble and bake fresh for the best result, or freeze the assembled unbaked tacos as described above.
Go Make Taco Night Something to Look Forward To
These crispy baked chicken tacos prove that a satisfying, crowd-pleasing dinner does not have to be complicated or require a lot of cleanup. With pantry staples, one skillet, and one baking sheet, you get golden, crunchy, cheesy tacos that work any night of the week. Give this recipe a try tonight and see why it keeps showing up on the dinner table again and again.
No-Fry Crispy Baked Chicken Tacos

Golden, crunchy baked chicken tacos filled with seasoned shredded chicken, salsa, and melted cheese. A simple and satisfying weeknight dinner with no frying required.
- Prep Time: 15 minutes
- Cook Time: 15 minutes
- Total Time: 30 minutes
- Yield: 10 to 12 tacos 1x
- Category: Dinner
- Method: Bake
- Cuisine: Mexican-American
- Diet: Gluten Free
Ingredients
- 2 cups cooked and shredded chicken (rotisserie recommended)
- 3 tablespoons olive oil, divided
- 1/4 teaspoon salt
- 1/4 teaspoon black pepper
- 1 medium white onion, chopped
- 1 jar (16 oz) salsa
- 1 packet (1 oz) taco seasoning
- 10 to 12 corn tortillas
- 1 1/2 cups shredded Colby Jack cheese
- Juice of 1 lime
Instructions
- Preheat oven to 425 degrees F and line a 9×13-inch baking sheet with parchment paper.
- Heat 2 tablespoons of olive oil in a large skillet over medium-high heat. Add chopped onion and cook until softened and translucent, about 3 minutes.
- Stir in shredded chicken, salsa, taco seasoning, salt, and pepper. Cook for 2 to 3 minutes, then remove from heat and stir in lime juice. Drain any excess liquid before filling tacos.
- Wrap tortillas in a damp paper towel and microwave for 30 seconds to make them pliable and prevent cracking when folding.
- Spoon a moderate amount of chicken mixture onto one half of each tortilla. Sprinkle with cheese, fold over, and press gently onto the prepared baking sheet to hold the shape.
- Lightly brush the tops of each taco with the remaining 1 tablespoon of olive oil for a crispy golden shell.
- Bake for 12 to 15 minutes until tacos are golden brown and crispy. For extra crunch, flip carefully with a spatula at the halfway point.
- Serve immediately while warm with sour cream, shredded lettuce, fresh cilantro, guacamole, salsa, or pickled jalapenos.
Notes
- Use rotisserie chicken to save time and skip a cooking step.
- Always microwave tortillas before folding to prevent cracking.
- Drain excess liquid from the filling before assembling to avoid soggy tacos.
- Brushing with olive oil before baking is essential for a crispy shell – do not skip it.
- Freeze assembled unbaked tacos for up to 2 months. Bake from frozen at 425 degrees F and add 5 to 8 extra minutes to baking time.
Nutrition
- Serving Size: 2 to 3 tacos
- Calories: 420 kcal
- Sugar: 4 g
- Sodium: 780 mg
- Fat: 18 g
- Saturated Fat: 6 g
- Unsaturated Fat: 11 g
- Trans Fat: 0 g
- Carbohydrates: 38 g
- Fiber: 4 g
- Protein: 28 g
- Cholesterol: 75 mg


