

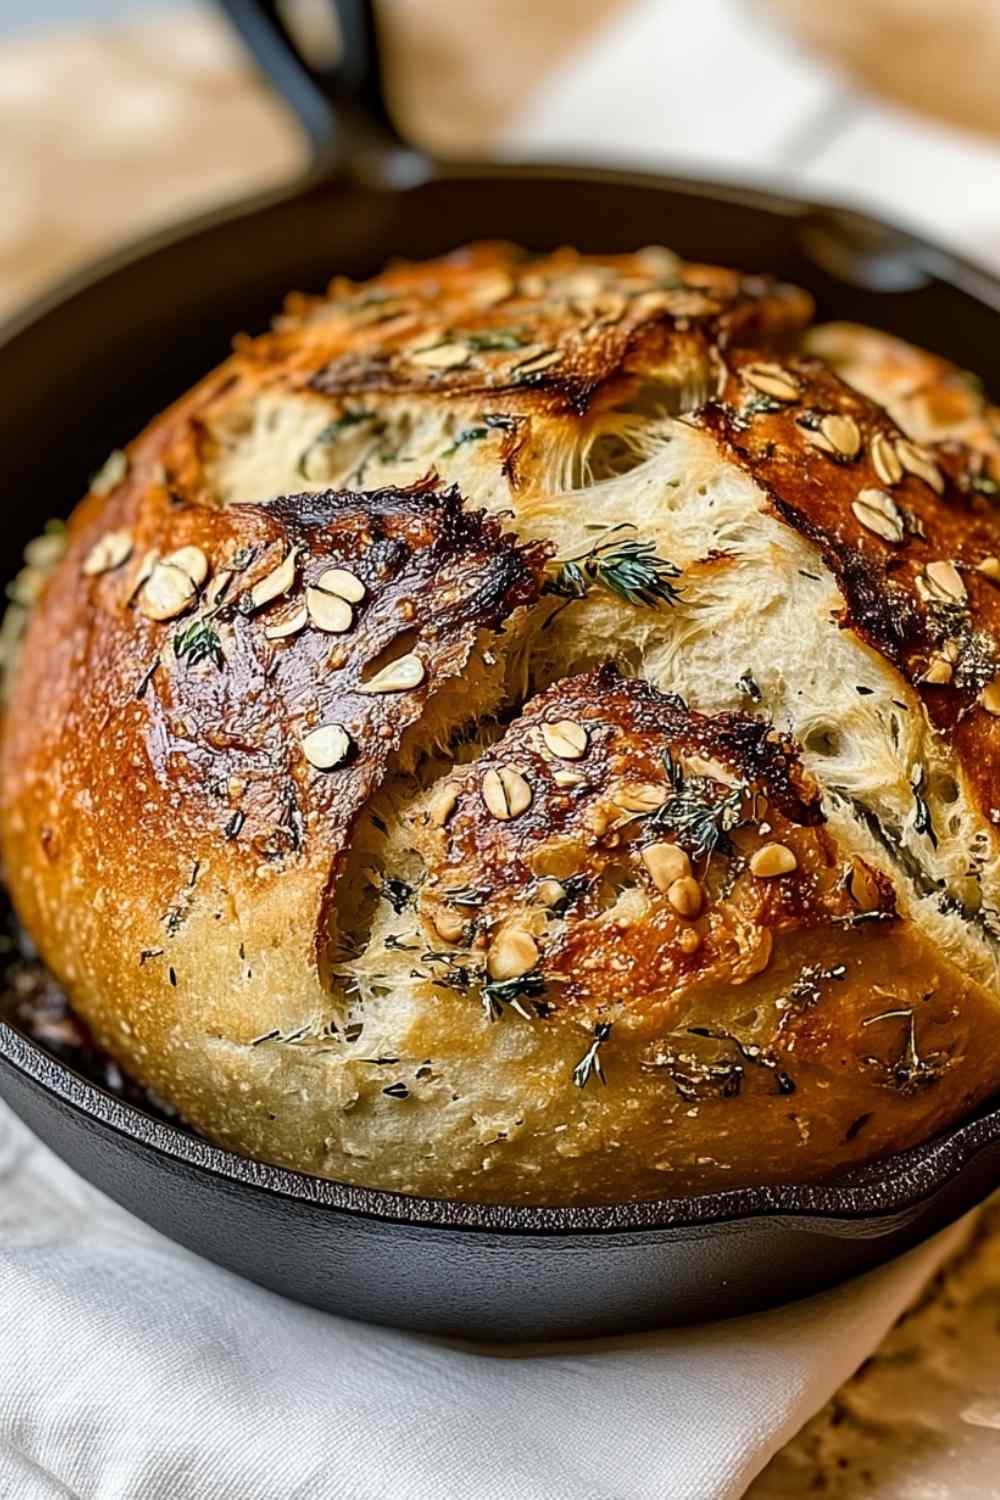
Garlic herb Dutch oven bread is one of those recipes that looks bakery-level impressive but requires almost zero skill. I remember the first time I pulled a golden loaf from my Dutch oven – the crispy crust crackled as it cooled, and I couldn’t believe something so simple tasted this good.
There’s something magical about no-knead bread. You mix everything in one bowl, walk away for the night, and wake up to bubbly dough ready to bake. The garlic and herbs add incredible flavor without any extra work. This rustic artisan bread has become my go-to for dinner parties, soup nights, and weekend mornings when I want fresh bread without spending hours in the kitchen. Whether you’re a first-time bread baker or just looking for an easy homemade loaf, this Dutch oven method delivers perfect results every single time.
Table of Contents
Simple Ingredients You’ll Need
I always recommend using fresh herbs for this garlic herb Dutch oven bread – the flavor difference is noticeable. However, you can substitute 1 teaspoon of dried herbs if fresh isn’t available. Here’s what you’ll need:
- 3 cups all-purpose flour (spooned and leveled for best results)
- 1 ½ teaspoons salt
- ½ teaspoon active dry yeast (yes, just half a teaspoon!)
- 1 ½ cups warm water (100-110°F for proper yeast activation)
- 2 cloves garlic, minced (I sometimes add 3 for extra punch)
- 1 tablespoon fresh herbs like rosemary or parsley, chopped
- 1 tablespoon olive oil (adds richness to the crust)
Pro tip: I prefer using a combination of rosemary and thyme for deeper flavor. The olive oil isn’t just for taste – it helps create that beautiful golden crust we’re after.

How to Make This No-Knead Bread
I recommend having everything measured before you start – this recipe moves quickly once you begin mixing. The key to perfect garlic herb Dutch oven bread is minimal handling.
Step 1: In a large bowl, whisk together the flour, salt, and yeast until evenly distributed. This ensures the yeast activates properly throughout the dough.
Step 2: Add the warm water, minced garlic, chopped herbs, and olive oil to the dry ingredients. Using a wooden spoon or spatula, stir everything together until a shaggy, sticky dough forms. The dough should look rough and wet. Don’t worry, this is exactly what you want. Resist the urge to add more flour. The high hydration creates those beautiful air pockets inside.
Step 3: Cover the bowl tightly with plastic wrap or a damp kitchen towel. Let it rise at room temperature (70-75°F) for 8-12 hours depending on your kitchen temperature. I usually mix mine before bed and bake it the next morning. In colder kitchens, the rise may take 12-14 hours. You’ll know it’s ready when the dough has doubled in size and the surface looks bubbly and active.
Step 4: About 30 minutes before you’re ready to bake, preheat your oven to 450°F (230°C). Place your Dutch oven (at least 5 quarts) with the lid on inside the oven while it preheats. This step is crucial – the hot pot creates steam that gives you that crispy, crackly crust.
Step 5: Once your oven and Dutch oven are fully preheated (wait the full 30 minutes), carefully remove the hot pot using oven mitts. Place a piece of parchment paper on the bottom of the Dutch oven. Scrape the risen dough from the bowl directly onto the parchment. You can gently shape it into a round if you like, but don’t overwork it or you’ll deflate all those air bubbles.
Step 6: Carefully place the lid back on the Dutch oven and return it to the oven. Be very cautious – the pot is extremely hot at this point.
Step 7: Bake covered for 30 minutes. The lid traps steam, which helps the bread rise and develops the crust. After 30 minutes, remove the lid and continue baking for another 10-15 minutes. Watch for a deep golden-brown color. The crust should look dark and crackly.
Step 8: Remove the bread from the Dutch oven immediately and transfer it to a wire rack. Let it cool for at least 30 minutes before slicing. I know it’s tempting, but cutting too early releases steam and makes the inside gummy.
Common mistake to avoid: Don’t add extra flour even if the dough seems too wet. Wet dough equals better texture in no-knead bread.
Perfect Pairings for Your Homemade Bread
This garlic herb Dutch oven bread pairs beautifully with dishes that can soak up its flavor.
Tomato Basil Soup: The garlic and herbs complement tomato-based soups perfectly. The crusty exterior is ideal for dipping while the soft interior soaks up every drop.
Roasted Chicken with Vegetables: Serve thick slices alongside roasted chicken. The bread’s savory notes match the caramelized flavors from roasting.
Italian Wedding Soup: The herby bread echoes the flavors in this classic soup. Use it to mop up the delicious broth.
Olive Oil and Balsamic Dip: Keep it simple with good quality olive oil and aged balsamic vinegar. The bread’s flavor shines with this classic pairing.
Creamy White Bean Stew: The hearty texture of this bread stands up to thick, protein-rich stews. Perfect for a cozy dinner.
More Delicious Bread and Comfort Food Recipes
This garlic herb Dutch oven bread is perfect alongside hearty soups and stews that soak up its delicious flavor. Serve it with our warming Slow Cooker Cowboy Soup, creamy Creamy Ravioli Soup, or comforting Kielbasa Potato Soup for a complete meal that feels like a warm hug.
For more homemade bread inspiration, try the crusty texture of Crusty Mini Baguettes, the unique flavor of Sourdough Bagels with Sun-Dried Tomatoes and Herbs, or the sweet-savory combination of Sweet Potato Honey Cornbread. Each recipe brings something special to the table and pairs beautifully with this garlic herb loaf.

Storing and Enjoying Leftovers
Store your cooled garlic herb Dutch oven bread wrapped in a clean kitchen towel or paper bag at room temperature for up to 2 days. Avoid plastic bags – they make the crust soft and chewy instead of crispy.
For longer storage, slice the completely cooled loaf and freeze individual slices in a freezer bag for up to 3 months. I like freezing slices because you can toast them straight from frozen for quick breakfasts or last-minute garlic bread.
To revive day-old bread, sprinkle the crust lightly with water and warm it in a 350°F oven for 5-7 minutes. The crust will crisp right back up. Pro tip: I often intentionally make this bread a day ahead for dinner parties because it slices cleaner when slightly stale.
Common Questions About No-Knead Bread
Can I use instant yeast instead of active dry yeast?
Yes, instant yeast works perfectly in this garlic herb Dutch oven bread. Use the same amount and mix it directly with the flour – no need to activate it separately.
Why is my garlic herb Dutch oven bread dense instead of airy?
This usually means the dough didn’t rise long enough. Make sure your rising spot is warm (70-75°F) and give it the full 8-12 hours. Cold kitchens need more time.
Can I make this bread without a Dutch oven?
A Dutch oven creates the best crust, but you can bake it on a preheated baking stone or sheet pan. Place a metal pan with water on the bottom oven rack to create steam. The crust won’t be quite as spectacular but it’ll still taste great.
Time to Bake Your Best Bread Yet
This garlic herb Dutch oven bread proves that impressive homemade bread doesn’t require fancy equipment or professional skills. The long rise does all the work while you sleep, and the Dutch oven method guarantees bakery-quality results every single time. Try this recipe and wake up to the most incredible bread you’ve ever made!
Garlic Herb Dutch Oven Bread

Easy no-knead garlic herb bread with crispy crust and soft interior. Beginner-friendly overnight recipe with minimal effort.
- Prep Time: 15 minutes
- Cook Time: 45 minutes
- Total Time: 13 hours 40 minutes
- Yield: 1 loaf (12 slices) 1x
- Category: Bread
- Method: No-Knead, Bake
- Cuisine: American
- Diet: Vegetarian
Ingredients
- 3 cups all-purpose flour
- 1½ teaspoons salt
- ½ teaspoon active dry yeast
- 1½ cups warm water (100-110°F)
- 2 cloves garlic, minced
- 1 tablespoon fresh herbs (rosemary or parsley), chopped
- 1 tablespoon olive oil
Instructions
- In a large bowl, whisk together flour, salt, and yeast until evenly distributed.
- Add warm water, minced garlic, chopped herbs, and olive oil. Stir with a wooden spoon until a shaggy, sticky dough forms. Do not knead.
- Cover bowl with plastic wrap or damp towel. Let rise at room temperature (70-75°F) for 8-12 hours until doubled in size and bubbly on surface.
- Preheat oven to 450°F (230°C). Place Dutch oven (at least 5 quarts) with lid inside and preheat for 30 minutes.
- Carefully remove hot Dutch oven. Place parchment paper on bottom and scrape risen dough onto parchment. Lightly shape into a round without overhandling.
- Cover with lid and bake for 30 minutes.
- Remove lid and bake 10-15 minutes more until crust is deep golden brown.
- Remove bread from Dutch oven and cool on wire rack for at least 30 minutes before slicing.
Notes
- Dough will be very sticky and wet – this is correct. Do not add extra flour as high hydration creates the airy texture.
- Use extreme caution when handling the preheated Dutch oven as it will be very hot.
- For best results, use a kitchen scale to measure flour (360g for 3 cups).
- In colder kitchens (below 70°F), the rise may take 12-14 hours.
- Experiment with herb combinations like thyme, oregano, or chives for variety.
Nutrition
- Serving Size: 1 slice (1/12 loaf)
- Calories: 140 kcal
- Sugar: 0 g
- Sodium: 295 mg
- Fat: 2 g
- Saturated Fat: 0 g
- Unsaturated Fat: 2 g
- Trans Fat: 0 g
- Carbohydrates: 26 g
- Fiber: 1 g
- Protein: 4 g
- Cholesterol: 0 mg


